Online Selling – Why Good Photography Is Essential

Online marketing can be trial by error and hopefully through my many errors I can help you to avoid making the same mistakes.
When I first began selling on Etsy, my photography wasn’t very good and I assumed like many other shop owners that it didn’t really matter what my images looked like. I couldn’t be further from the truth! One of the single most important aspects of successful online selling can be the difference between excellent imagery and poor imagery.
Why is Good Photography Essential?
In every sense of the word, your photography must be excellent. There is no way around it. I am also a buyer on Etsy and I have never clicked on any badly photographed product with the intention of purchasing. Unfortunately, many customers equate poorly photographed stock to equal poorly manufactured products or a poor product. Time and time again I see poorly photographed images and if you are like the many who don’t invest in photographic excellence, your prospective customers may never visit your shop. If your shop hasn’t captured their imagination and curiosity within 3 seconds you have lost them for good.
If you think you need to be an expert ‘stock’ photographer you’re wrong, all you need is the ability to want to learn and be willing to invest in some photography classes. There is a myriad of free photography lessons you can access on YouTube and you can enroll in a photography course run by your local community, there should be NO excuses why you can’t take excellent images. This article has some great pointers for different aspects of digital photography. If you are unsure of what ‘Shutter Speed, ‘Aperture’ and ‘F-stop’ mean or hwo to find these settings find your camera manual or Google your camera’s model and make and download the instructions.
Some tips to get you started are:
- Use natural light only and turn off all overhead tungsten lighting;
- Avoid direct sunlight and make sure your area is nice and bright;
- Avoid messy and cluttered backgrounds; keep all backgrounds plain and out of focus;
- Always photograph your products by using different angles and camera tilts to see what works best;
- Keep it simple; don’t add to many unnecessary ‘props’ to your product;
- Close up’s work well for some products but that is not always the rule of thumb. Try close up’s and some a little further away and see what looks the best;
- Your product should be seen photographically as a piece of art, the customer doesn’t need to see every minute detail. You can use the product description to advise the customer of the finer handmade points; and lastly
- In a well-lit area, organise a little photo centre in your home so you find taking images quick and easy every time.
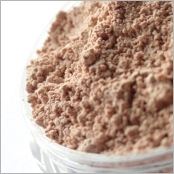
Both these Etsy shops are selling mineral makeup. As you can see in image 1 the image has no design compass or interest, it almost looks like an aerial view of sand dunes.
As you can see in image 2 it is beautifully presented, its clear, crisp and clean, good depth of field by showing attention to the powder detail. This image shows off the product beautifully.
Photo Editing Software
If you haven’t already invested in good photo editing software – it’s high time you did! Most photographs I take are a good start, but photo-editing software is critical to make a photo ‘online’ or ‘Etsy ready.’
Personally I use, Adobe (CS5) Photoshop, but there are many other software programs available that are more cost effective and in some cases free to download. Adobe will cost upward of around $1,000 and add more if you want the entire creative suite. Adobe Photoshop (in my opinion) is far more superior, so if you are a student, check with your college bookstore and ask them if they offer Adobe products, you may be entitled to a considerable discount.
Campus Tech offers tons of computer programs discountable to anyone with a valid student ID. Some other lower priced software options include: 1. Photo Explosion; and 2. Corel Paintshop Photo.
Free downloadable options include: Picasa and Photoscape are both good programs, and GIMP, I personally found this program difficult to use, however you may have a different experience.
You can improve your images by removing the grey or blue background tinge by adjusting the Brightness/Contrast. This will whiten your background and correct exposure. Adjustments and corrections are different with every photograph and program, but tweaking these will help you improve the photograph.
Occasionally I take a photograph of a pink eye shadow and it looks purple when I import it. This is easily adjustable through color/hue corrections. Use these adjustments to fine-tune the photograph to show the true colors.
Every photograph can be sharpened. Don’t over sharpen because the photo will look coarse, but make sure edges are crisp and clear.
What is going to make someone want to click on your product as opposed to visiting your competitor? Etsy is a place for artists, not a place to make a quick buck, so remember to be original. Creativity is the heart of handmade. Not only will original photos and products bring you success, but you will feel pride in knowing you did it all on your own. I found what worked for me and gained a large clientele in the process. I am creative and unique in my work and that’s shows.
It can be very helpful to check out what others are doing on Etsy, but don’t copy their work. Copyright infringement is a huge problem on Etsy. The originators are usually the most successful and buyers are smarter than you might think. I can tell an original from a copy in about 2 seconds. Keep this in mind when photographing and designing your product.
You can use all of the tips above and more and still have a photograph that is unique and stands out above the rest. Most of us are not the only seller in our specific category, and the only way to not drown amongst the other sellers is to be unique.
Practice makes perfect! You’ll learn in time what works and what doesn’t. Image 1 was taken when I was learning how to take photographs. It has a bluish tinge and has no particular point of focus, and isn’t nice and crisp or interesting.
You can see how practice pays off, image 2 is perfectly exposed, the colour is good, and it’s crisp and clean and shows adequate detail in the powder. Practice, practice, practice…!
Think like a customer and ask yourself why would I purchase the product in image number 2 instead of the product in image number 1.
Photographs and text written by Jackie from Noella Beauty Works
Contributing Author Peta Di Palma


Thank you so much!!! Extremely helpful and inspiring!
Hi Jerry, thanks for chiming in! Pop in again, there’s a great article on business cards.
What does one do when the background is too blue and while trying to correct it turns too yellow?
Visit our team page…I’ve just posted an app that might be able to help you!